System KAN-therm Groove

SYSTEM KAN-therm

Groove

Installation
Range of diameters DN25-DN300
Application

The grooving process can be made in two ways:

  • through embossing – the pipe wall is pressed between rolls (material deformation),
  • through cutting – the pipe wall is cut circumferentially (removing the material).

Below is a list of steps to follow in case of installing grooved connectors. If additional steps are required for certain models, they can be found in the technical section of KAN-therm Groove Catalogue.

KAN-therm - Groove system - 3d models with grooving made
KAN-therm - Groove system - Assembly step 1 - Preparation of pipes

Check and prepare pipe ends

To achieve the optimum quality of the sealing, the outer surface of the pipe ends must be free of any dents, protrusions, rolling marks or other surface defects such as loose paint, deposits, dust, chips, grease or rust.

KAN-therm - Groove system - Assembly step 2 - Checking the seals

Check the seal

Make sure that the supplied seal is suitable for the intended application. The stripe colour determines the seal type.

KAN-therm - Groove system - Assembly step 3 - Lubrication of gaskets

Grease the seal

To make it easier to insert the pipe and install the connectors without pinching, apply a thin layer of grease available in the KAN-therm Groove offer to the lips of the seal and the outer coating of the seal. Any other suitable lubricant may be used, unless it has properties that could lead to seal damage.
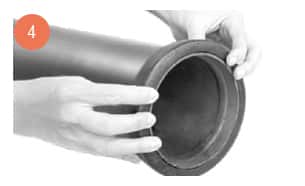
KAN-therm - Groove system - Assembly step 4 - Assembly of gaskets

Mount the seal

Mount the seal on one end of the pipe, so that the end of the pipe is visible. No part of the seal should extend beyond the end of the pipe.

KAN-therm - Groove system - Assembly step 5 - Pipe connection

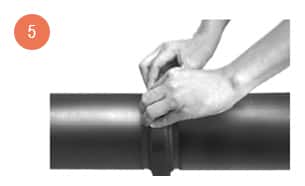
Connect the second pipe

Measure and match the two ends of the pipes you want to connect. Slide the seal over the ends and centre it between the grooves of the pipes joined. No part of the seal should enter the pipe
grooves.

KAN-therm - Groove system - Mounting step 6 - Mounting the gasket

Mount the seal

Mount the seal on one end of the pipe, so that the end of the pipe is visible. No part of the seal should extend beyond the end of the pipe.

KAN-therm - Groove system - Assembly step 7 - Screwing together both parts of the clamp

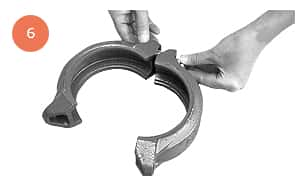
Twist both halves of the clamp

Mount both halves of the clamp at the same time. Ensure that the wedges of the coupling engage in the grooves

.

KAN-therm - Groove system - Assembly step 8 - Tightening the nut

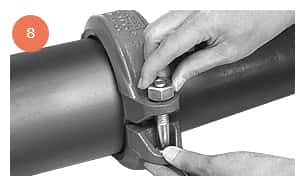
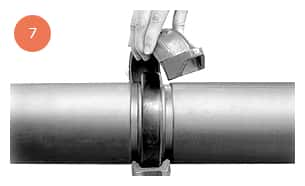
Insert bolts and place nuts

Insert all bolts and tighten nuts by hand.

Make sure that the oval bolt head is locked into the bolt hole in the connector housing.

KAN-therm - Groove system - Assembly step 9 - Tightening the nuts

Tighten the nuts

Tighten the nuts alternately and with equal force until the protrusions of the clamp touch each other (metal-to-metal contact). 

Tighten the nuts a quarter or half turn to make sure that the bolts and nuts are tight against the attachment.

The use of a torque spanner is not required.

KAN-therm - Groove System - Assembly step 10 - Tightening the bolt nut

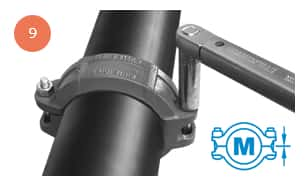
Tighten the bolt nuts

Always tighten the nuts to the required torque with a torque spanner. 

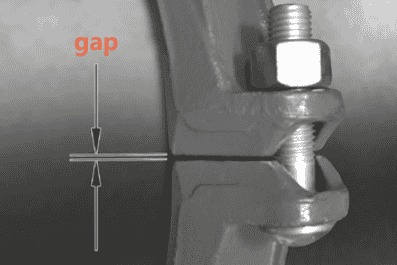
Usually after tightening the bolts and nuts, you can see gaps between the clamp protrusions. 

The gaps between the protrusions should be the same on both sides of the connector.

Do you need help or do you want to learn more?
Contact us!

I agree to processing of my personal data by KAN Sp. z o.o.
I agree to processing of my personal data included in the form by the data administrator - KAN Sp. z o.o. based in Kleosin ul. Zdrojowa 51, 16-001 Kleosin in order to provide information about the company, offered products, organized training and promotional and marketing actions.
I agree to use telecommunication terminal equipment by KAN Sp. z o.o.
I agree to receive commercial information in the form of a newsletter to the e-mail address provided by me, including in the form of attachments to e-mail messages, in accordance with Article 10(1) of the Act of 18 July 2002 on services rendered electronically.
I agree to receive commercial information to the e-mail address given.
I agree to use telecommunication terminal equipment of which I am the user, i.e. telephone and e-mail box, by KAN Sp. z o.o. KAN Sp. z o.o. based in Kleosin ul. Zdrojowa 51, 16-001 Kleosin, for the purposes of direct marketing in accordance with Article 172 of the Act of 16 July 2004 – Telecommunications law.

The provision of personal data is voluntary, although necessary for the proper operation of your account and all the functionalities associated with it. Information about the user’s rights, including the right to access the content of data, rectification, erasure, restriction of processing, data portability, object, withdraw consent at any time without affecting the lawfulness of the processing and to lodge a complaint with the supervisory authority for data protection is further specified in:

Privacy policy Rules of electronic services provision

Confirm you are not a bot

Indicate one correct picture:

Cookies settings

We use cookies to provide a variety of services, to continuously improve our services, to display advertisements according to your interests on our website and to provide social media features. Some cookies are necessary for the proper functioning of our website and to enable you to use its functions. With your consent, we also use analytical cookies to improve our website and marketing cookies to display advertisements and content on our website. Learn more about cookies and how to use them.
By clicking “Accept all", you consent to the use of all cookies. By clicking "Customise cookie settings", you can choose which cookies you accept. You can change your cookie settings or withdraw your consent at any time.

Cookies settings

This tool helps to select and deactivate the various tags/trackers/analytics tools used on this website.